Written by: Dariy Bek
It’s a scenario we all dread. You’re about to capture the perfect nighttime photo, scan a document in a dim room, or just find your keys in the dark, and… nothing. You tap the flashlight icon, and it’s grayed out. You open the camera, and the flash icon is unresponsive. A non-working phone flash is more than an inconvenience; it feels like a core part of your $1,000+ device has failed.
You’re not alone, and the solution might be simpler than you think. But it’s crucial to know what you’re dealing with. Is this a simple software bug, or is it a sign of a deeper hardware problem?
As professional technicians at Hot Tech Repair, we see this issue daily. We’ve handled everything from simple app conflicts to complex, post-drop hardware failures. This guide is built from our direct experience (E-E-A-T) in diagnosing and fixing these exact problems. We’ll walk you through every troubleshooting step, from the 60-second fixes to the advanced diagnostics.
While this guide provides expert-level information, remember that performing complex repairs (like opening your device) carries risks and can void your warranty. This content is for informational purposes. For hands-on help, our diagnostics team is always ready to take a look.
Section 1: Why Did My Flash Stop Working? (Understanding the Causes)
Before we jump into fixes, let’s understand why your flash might be on strike. Your phone’s flash isn’t just a simple bulb. It’s a powerful LED (Light Emitting Diode) component tightly integrated with your phone’s camera module, logic board, battery, and operating system. A failure in any part of this chain can disable it.
Here are the most common culprits, broken down by what we see most often.
1. Software & App Conflicts (The Most Common Culprit)
In most cases, the hardware is fine. The problem is a digital traffic jam.
- App “Hogging”: The most frequent issue. You used the flashlight from your control center, then opened the camera app. Or maybe a third-party app like Instagram or a QR scanner accessed the camera. The software “permission” to control the flash didn’t get “released” properly, so now no app can access it.
- Corrupted Cache: The camera app, like any app, stores temporary files (cache) to run faster. If this data becomes corrupt, it can cause bizarre behavior, including a non-functional flash.
- Operating System (OS) Bugs: Sometimes, a recent iOS or Android update introduces a new bug that creates a conflict. This is common in beta software but can occasionally slip into public releases.
2. Environmental & Power Issues (The “Protective” Failures)
Your phone is smart. It actively protects itself from damage, and these protections often involve disabling the flash.
- Overheating: This is a major one. If your phone is hot—from gaming, sitting in a hot car, or charging—its thermal management system will intentionally disable the flash to prevent overheating the LED and damaging the battery. You will often see an “iPhone needs to cool down” or similar warning, but the flash is disabled long before that critical message appears.
- Low Battery / Power Saver Mode: The flash is a high-drain component. When your phone enters Low Power Mode (iOS) or Battery Saver (Android), it disables non-essential background tasks and hardware features. The flash is one of the first things to go.
- Conflicting Settings: Sometimes, a specific setting in your camera app (like a certain filter, “Night Mode” in some implementations, or a specific video setting) may disable the flash by default.
3. Physical & Hardware Damage (The “Uh-Oh” Scenarios)
This is the most serious category. If the software fixes don’t work, it’s highly likely a physical component has failed.
- Drop Damage: This is the #1 hardware cause. You dropped your phone. Even if the screen or back glass didn’t crack, the shockwave inside can be enough to dislodge the tiny, delicate flex cable that connects the camera/flash module to the logic board.
- Water Damage: Water is the enemy of electronics. A tiny bit of moisture seeping into the camera lens area can cause corrosion on the connectors, leading to a short circuit or a complete failure of the connection.
- Module Failure: Like any electronic component, the LED module itself can simply burn out or fail over time. This is rare on new phones but can happen.
- Related Component Failure: Sometimes, the problem isn’t the flash but the component that powers it. A failing battery might not be able to provide the sudden burst of power the flash needs, or a fault on the logic board’s power management IC could be to blame.
Section 2: The Complete DIY Software Troubleshooting Guide
Let’s fix this. We will start with the simplest, most common fixes and work our way to the most advanced. Do these in order.
- E-E-A-T Note: As repair professionals, we follow this exact diagnostic tree. Don’t skip a step because you think it’s “too simple.” The simple reboot fixes over 50% of these issues.
2.1: The 5-Minute Fixes (Start Here)
These steps resolve the majority of software-based flash issues.
Fix 1: Test the Flashlight AND Camera
This is the most important diagnostic step.
- Swipe down (or up) to open your Control Center (iOS) or Quick Settings (Android).
- Tap the Flashlight icon.
- Result 1: If the flashlight turns on, your hardware is almost certainly working perfectly. The problem is a software conflict with your camera app.
- Result 2: If the flashlight does not turn on (or is grayed out), the problem is deeper. It could be a hardware issue, an OS-level bug, or an environmental trigger.
- Now, open your native Camera app. Try to turn the flash “On” (not “Auto”). Take a picture. If it doesn’t work, the problem is confirmed.
Fix 2: Close All Apps & Perform a Hard Reboot
This clears the app “hogging” issue we discussed.
- Close all apps: Swipe up from the bottom of your screen and “flick” every open app away. This ensures no app is holding the flash permission.
- Perform a Hard Reboot (or Force Restart): This is more effective than a simple power-off.
- On modern iPhones (8 and newer): Quickly press and release Volume Up. Quickly press and release Volume Down. Then, press and hold the Side (power) button until you see the Apple logo appear.
- On most Android phones: Press and hold the Power button and the Volume Down button simultaneously for 10-15 seconds until the phone restarts.
- Once the phone reboots, try the flashlight and camera again before opening any other apps.
Fix 3: Check for Heat and Low Battery
- Check Battery: Is your battery below 20%? Is Low Power Mode / Battery Saver on? If yes, charge your phone to at least 30% and turn off power-saving mode. Try the flash again.
- Check Temperature: Is your phone hot to the touch? If yes, stop using it. Remove it from its case and let it cool down to room temperature for 15-20 minutes. Do not put it in the freezer. Try the flash again.
2.2: Intermediate Software Fixes (If the Basics Failed)
If the flash still isn’t working, let’s dig a little deeper into the software.
Fix 4: Clear the Camera App Cache (Android Only)
This fix is specific to Android and is highly effective. It does not delete your photos.
- Go to Settings > Apps > See all apps.
- Find and tap on “Camera”.
- Tap on “Storage & cache”.
- You will see two options: “Clear cache” and “Clear storage.”
- Important: Tap “Clear cache” first. This deletes temporary files. Reboot your phone and test the flash.
- If it still doesn’t work, you can try “Clear storage,” but be aware this will reset your camera app to its factory settings (your saved preferences will be gone, but your photos are safe).
Fix 5: Reset All Settings (iOS & Android)
This is a great step before a full factory reset. It does not delete your data, apps, or photos, but it will reset all your system preferences (like Wi-Fi passwords, Bluetooth pairings, and wallpaper).
- On iOS: Go to Settings > General > Transfer or Reset iPhone > Reset > Reset All Settings.
- On Android: Go to Settings > System > Reset options > Reset all settings (or “Reset network settings” and “Reset app preferences” individually).
After the phone restarts, you’ll need to re-enter your Wi-Fi password. Now, test the flash.
Fix 6: Check for an OS Update
That bug you’re experiencing? It might be a known issue that Apple or Google has already fixed.
- On iOS: Go to Settings > General > Software Update.
- On Android: Go to Settings > System > System update > Check for update.
- External Link: For the most reliable information on updates, always check the official manufacturer support pages, like Apple Support or Google’s Pixel Support.
2.3: Advanced Software Fixes (The Last Resort)
If your flash is still not working, the software itself may be fundamentally corrupted. These are the final steps before we declare it a hardware problem.
Fix 7: Boot into Safe Mode (Android Only)
Safe Mode restarts your phone with all third-party apps disabled. If the flash works in Safe Mode, you know 100% that an app you downloaded is the culprit.
- Press and hold the Power button until the power-off menu appears.
- Press and hold the “Power off” or “Restart” icon on your screen.
- A pop-up will appear: “Reboot to safe mode.” Tap “OK.”
- Your phone will restart and will say “Safe mode” in the corner.
- Now, test the flashlight and camera.
- If it works: An app is the problem. Restart your phone normally and start uninstalling recent apps (especially flashlight apps, camera apps, or QR scanners) one by one until the flash starts working again.
- If it still doesn’t work: The problem is not a third-party app.
Fix 8: The Factory Reset (Erase All Content)
This is the nuclear option. This step will erase everything on your phone and return it to its out-of-the-box state. It is the only way to be 100% certain that the problem is not software.
CRITICAL WARNING: You MUST back up your phone before doing this. All photos, contacts, messages, and data will be permanently deleted.
- Back Up First:
- iOS: Go to Settings > [Your Name] > iCloud > iCloud Backup > Back Up Now.
- Android: Go to Settings > Google > Backup > Back up now.
- Perform the Reset:
- iOS: Go to Settings > General > Transfer or Reset iPhone > Erase All Content and Settings.
- Android: Go to Settings > System > Reset options > Erase all data (factory reset).
After the phone reboots and you go through the initial setup before restoring your backup, test the flash. If it still doesn’t work, the problem is confirmed as hardware. At this point, stop troubleshooting and seek professional help. Continuing to diagnose a hardware issue without the right tools can cause more damage.
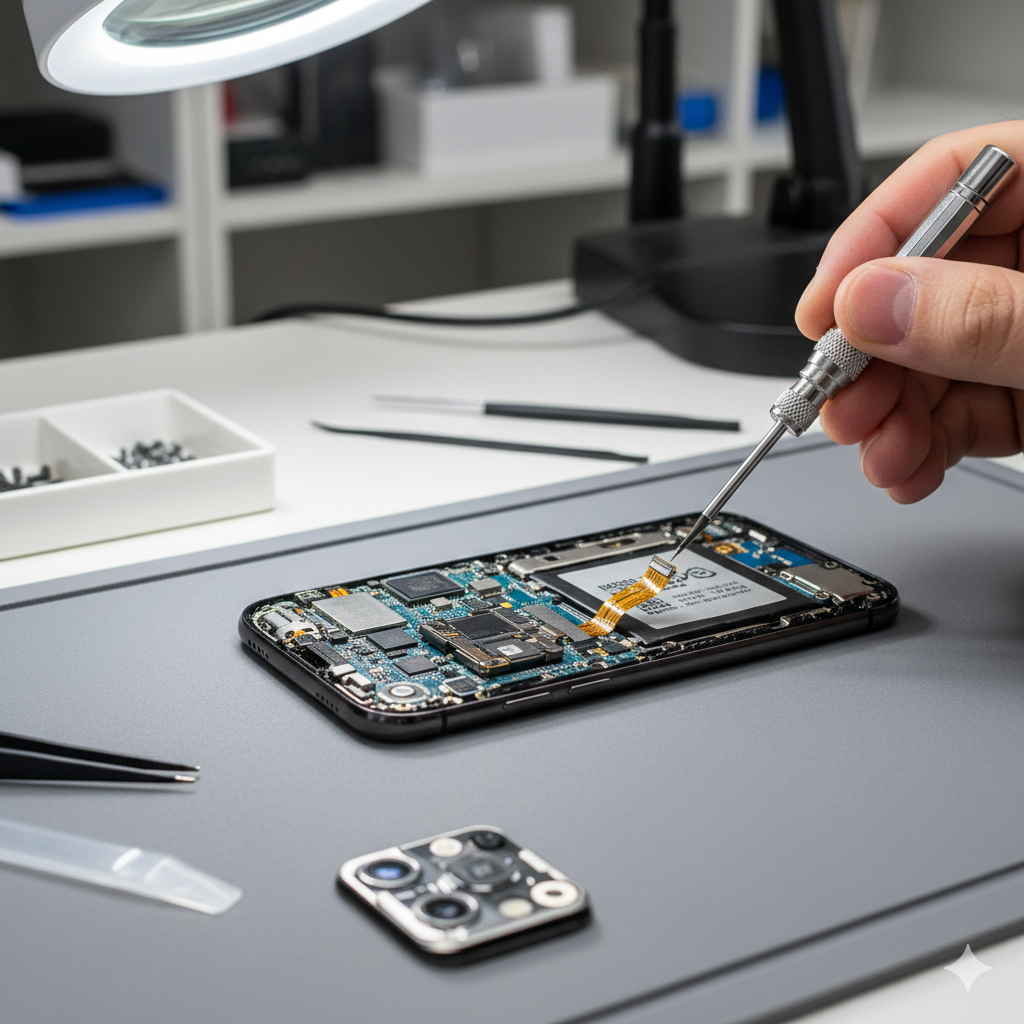
Section 3: Hardware Failure: When the Module Needs a Professional
If you’ve made it this far, and especially if the factory reset did nothing, it’s time to accept that the problem is physical. The software is trying to turn on the light, but the light itself (or its connection) is broken.
3.1: Understanding the Camera/Flash Module
On 99% of modern smartphones, the rear flash LED is not a separate part. It is built directly onto the same small circuit board and flex cable as the rear camera(s). This is called the camera module assembly.
This is crucial because:
- You cannot replace just the flash. You must replace the entire rear camera module.
- The module connects to the main logic board via a tiny, delicate, press-on (ZIF) connector.
As mentioned in Section 1, a hard drop is the most common cause of failure. The physical shock can partially unseat this connector, cutting the connection. In other cases, the fine-wire bonds inside the module itself can break.
3.2: The Risks of DIY Hardware Repair
You might be tempted to buy a $30 module online and fix it yourself. As professionals who clean up failed DIY repairs, we strongly advise against it.
- E-E-A-T Disclaimer: Opening a modern phone (especially an iPhone or high-end Samsung) is extremely difficult without specialized tools and experience.
- Risk 1: Screen & Back Glass: Most phones are glued shut. You need a precise heat gun and pry tools to open it without shattering the $200+ OLED screen or back glass.
- Risk 2: Battery Puncture: The battery is often glued in right next to the camera components. A metal tool slipping and puncturing the lithium-ion battery can (and does) cause an immediate, violent fire.
- Risk 3: Tearing Flex Cables: The inside of your phone is a maze of paper-thin flex cables for the screen, battery, charging port, and volume buttons. Tearing any of them turns a $50 flash repair into a $300 multi-part repair.
- Risk 4: Electrostatic Discharge (ESD): Your body carries static electricity. Without a proper ESD-safe mat and wrist strap, a single touch to the logic board can fry a microchip, permanently “bricking” your phone.
- External Link: Reputable DIY sites like iFixit publish excellent guides, but even they highlight the difficulty and risk involved in these component-level repairs.
This isn’t a simple battery replacement; it’s a delicate, microscopic operation.
Section 4: The Professional Solution: Diagnosis & Module Replacement
When you bring your phone to a professional repair shop like Hot Tech Repair, you’re not just paying for a part; you’re paying for expertise, safety, and a guarantee.
4.1: Our Diagnostic Process
First, we don’t just “replace the module.” We confirm the diagnosis.
- Verification: We run our own software diagnostics to rule out any obscure OS-level corruption.
- Safe Disassembly: We use a controlled-heat environment and specialized tools to safely open your device, preserving all waterproofing seals.
- Microscopic Inspection: We place the logic board under a microscope. We check the camera module’s connector first. Is it dislodged? Is there corrosion? Is a tiny capacitor on the board itself (a “filter”) blown?
- The “Re-seat”: In many cases, the connector is just loose. We can carefully disconnect it, clean the contacts with 99% isopropyl alcohol, and “re-seat” it firmly. We test the phone. If the flash now works, your repair is complete and very affordable.
4.2: The Module Replacement
If the re-seat doesn’t work, or if the module shows visible damage, we proceed with the replacement.
- Sourcing: We use high-quality, OEM-spec camera modules.
- Installation: The old module is removed, and the new one is clicked into place.
- Testing: We reassemble the phone and test everything: all cameras (wide, ultrawide, telephoto), all video modes, portrait mode, and of course, the flash and flashlight.
- Re-Sealing: We apply new, high-grade waterproofing adhesive and seal the device, restoring its original integrity as much as possible.
This entire process ensures a safe, reliable, and long-lasting fix. You can see examples of our component-level work in our gallery.
4.3: Get Your Free Quote
Don’t guess what’s wrong, and don’t risk damaging your phone further. Our team can give you a clear answer and a fair price. If you’re local to Sacramento, CA, come visit us!
For everyone else, we make it easy.
- Get an instant quote on our website.
- Ready to get it fixed? Start your repair-a-device ticket right now.
- An instant quote takes the guesswork out of your repair.
Conclusion: A Bright Light at the End of the Tunnel
A non-working camera flash is deeply frustrating, but it’s almost always fixable. As we’ve covered, the problem is most often a simple software glitch, an app conflict, or a protective measure by your phone (like overheating or low battery). By following the software troubleshooting steps in this guide, you can solve the issue yourself in most cases.
However, if you’ve done a full factory reset and the flash is still dead, you can be confident it’s a hardware failure. At this point, stop troubleshooting. Trying to “fix” a hardware problem without the right tools and expertise is the fastest way to turn a small problem into a very expensive one.
Trust the experts. At Hot Tech Repair, this is what we do. We have the tools, the E-E-A-T (Experience, Expertise, Authoritativeness, and Trust), and the passion to get your device working perfectly again. Visit our about-us page to learn more about our team, or contact-us directly with any questions.
FAQs (Frequently Asked Questions)
Q1: Why does my flashlight work but my camera flash doesn’t? A1: This is almost 100% a software issue. It means your hardware (the LED) is fine. The problem lies with your camera app. The first thing to try is clearing the camera app’s cache (on Android) or Resetting All Settings (on iOS), as described in Section 2 above. A simple phone reboot often fixes this as well.
Q2: Can a software update break my phone’s flash? A2: Yes, absolutely. While rare, a bug in a new OS update (especially beta versions) can cause a “driver” conflict, essentially stopping the operating system from communicating with the flash hardware. This is usually fixed in a subsequent “patch” update. This is why we always recommend keeping your phone updated.
Q3: How much does it cost to replace a camera flash module? A3: Because the flash is part of the entire rear camera assembly, the price varies significantly by phone model. On an older phone, the part may be inexpensive, while on a new flagship (like an iPhone 15 Pro Max or Samsung S23 Ultra), the camera module itself can be one of the most expensive components. We recommend getting an instant quote for your specific model to get an accurate price.
Q4: Will my phone’s flash stop working if my battery is old and weak? A4: Yes. A camera flash requires a short, very powerful burst of energy. An old, degraded lithium-ion battery may have a low “peak voltage capacity,” meaning it can’t provide that burst of power, even if the phone itself is at 50% charge. The phone’s OS will simply disable the flash to prevent a “brown-out” or a sudden shutdown. If your flash only fails when your battery is below 70-80%, it’s a strong sign you need a battery replacement.
Disclaimer
The information provided in this blog post is for educational and informational purposes only and does not constitute professional repair advice. While we strive to provide accurate and expert-level guidance, performing any DIY repairs on your electronic device carries significant risks, including (but not limited to) data loss, further damage, battery fire, and voiding your manufacturer’s warranty. Hot Tech Repair is not liable for any damage or injury that may occur as a result of following the steps in this guide. For a safe and guaranteed repair, please consult a qualified professional technician, such as the team at Hot Tech Repair.